

This section will describe in steps the software and "How To" use it.
index
1 Setting Up
There are several things you must prepare for the tool to work properly. Following these steps will save you a lot of headache.
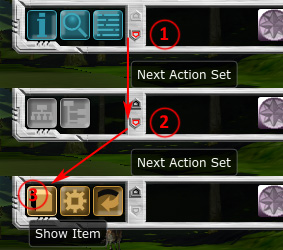
1.1 Disable Claim Deed Object
For propper claim deed scanning you must hide/disable the claim deed object in the claim deed window. To do this follow these 3 simple steps:1) In any item window click the little arrow in the bottom left corner
2) Click it once more
3) Click on the box icon, and the item should dissapear
If the claim deed item is left under the text while canning it can interfere with the algorithm and the scanning will fail.

1.2 Enable Main Chat Logging
The tool depends on reading multiple things from chat, like resource depleted messages planet and position information your globals and hof. Chat messages are stored in a chat.log file where the tool can access and process them. To have the chat log file active you must enable it in the in-game options. To do this follow these 2 simple steps:1) In the Options window click HUD
2) Enable the "Enable Main Chat Logging" checkbox
If this option is not selected you will not be able to locate yourself by pressing P and the tool will not let you operate it. All the buttons will be grayed out.
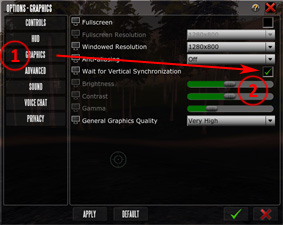
1.3 Enable Wait for Vertical Synchronization
Vertical Synchronization is important to improve screenshot capturing by limiting the amount of resources Entropia Consumes. Without it Entropia will try to render as many frames as possible limiting other programs performance if taking a claim deed scan takes a long time, enabling Vertical Sync might help speed things up. To do this follow these 2 simple steps:1) In the Options window click GRAPHICS
2) Enable the "Wait for Vertical Synchronization" checkbox
If this option is not selected you might expirience additional lag when scaning a claim deed or with the Autmatic Position and Automatic Drop detection features.
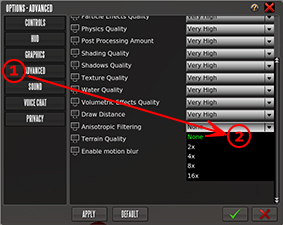
1.4 Disable Anisotropic Filtering
Anisotropic Filtering will post process ingame textures causing automatic features to fail with recognizing the markers needed to perform image recognition. To do this follow these 2 simple steps:1) In the Options window click ADVANCED
2) Disable the "Anisotropic Filtering" in the drop down box
If this option is not Disabled the auto features for claim and scanner detection wont work.
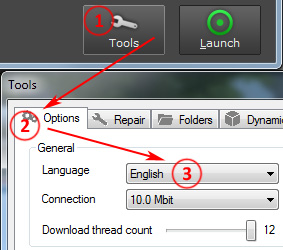
1.5 English language
Little Big Mining Log currently understands only english so to use it you must play with the english version of the client. To do this follow these 3 simple steps:1) Before the game starts in the client loader press the Tools button
2) Open the Options tab (its opened by default)
3) Select "English" from the Language dropdown
If the language is not set to English the program will be unable to understand messages printed in the chat window, it will fail to detect your initial position and planet and to recognize your globals and hofs.
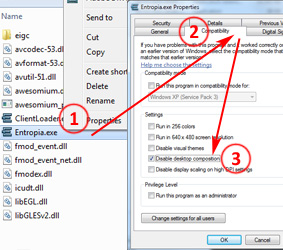
1.6 Disable Desktop Composition
(optional) Only when playing in full screen or getting black screenshots.To allow the tool to capture your game screen in full screen mode you must disable Desktop Composition. This will disable areo effects while the game is running and once the game shuts down it will return the nice visual effects. To do this follow these 3 simple steps:
1) Rightclick the Entropia Universe\bin32\Entropia.exe file and select Properties
2) Open the Compatibility tab
3) Enable the "Disable Desktop Composition" checkbox
If this option is not selected all claim deed scanning attemtps will result with an error and a all black screenshot.
2 Installing and running the tool
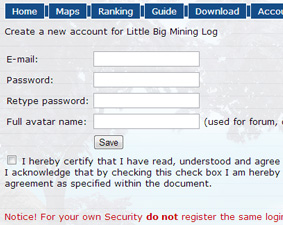
2.1 Create your account
To start using the Little Big mining Log you must create an account. You do it here on the website the tool's login window also holds a link to the account setup page.1) We require an e-mail address, a password.
2) It is reccomended to add your Full Avatar Name.
3) Users should not register their Entropia Universe login details (username and password) in the Little Big Mining Log system.
4) You also have to agree to our Terms of Use.
An e-mail will be sent to the account you provide with an activation link. Use it to activate your account and you are set to go.
2.2 Download, Unzip and Update
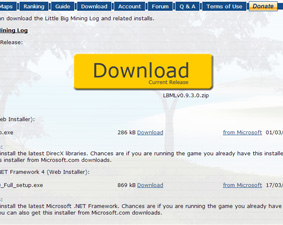
To start running the tool:1) Download the latest release from here on the website.
2) Unzip it to any location you have write access to.
3) Run the LittleBigMiningLog.exe or Updater.exe to update the tool with all the mini patches.
If you are worried about keyboard hooking and key logging please read the "A word on keyboard hooking" chapter below.
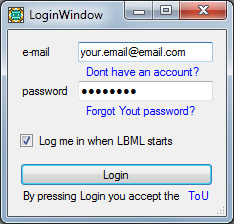
2.3 Log In
Login using your credentials1) Enter your login e-mail
2) Enter your password
3) (optional) Select to be logged in automatically
4) Press login
If you select to be remembered the tool will store your username and password as plain text in the LittleBigMiningLog.exe.config file. You can always erase them by hand or by pressing Log Out in the tools File menu.
3 Basics of operation
There are 3 general modes the Little Big Mining Log can operate in:
1) Automatic - the tool will do almost eveything itself by using advanced OCR techniques (might eat up system resources)
2) Kotkeys - where you can bind some keyboard keys and interact with the tool using those (keybinds must be enabled)
3) Buttons - most painful way but its there you can use the GUI buttons to interact with the tool.
In each subchapter where applicable we will reference these methods.
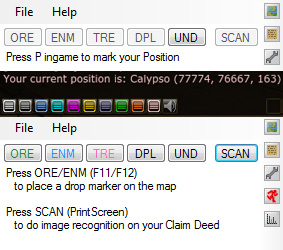
3.1 Finding yourself on the map
Press P or any other key you have binded ingame to the "Position" action to send your current coordinates to the chat.The tool monitors the chat.log and will pick up on the key pressed. If you mark your position for the first time it will set your planet and enable the drop and scan features.
-- Automatic:To set up automatic radar tracking and identify your radar's size, first click File, then Settings, then Auto, and follow the green highlighted text for guidance. Make sure the Position from Radar button is checked. Follow step 1 and drag your radar so the top left corner of the radar is in the very top left of your game window. Once you have done that, click the Capture Sample button. If the radar is positioned correctly the white radar resoze arrow should be visible in the screenshot. Step 2 is clicking on that arrow in the LBML screenshot. Step 3 is a zoomed in image of the arrow, so click on the pixel that’s in the lower right corner of the arrow.
The window will revert back to step 1, but now show a screenshot of your longitude and latitude coordinates. If correctly captured, the formerly red indicator will turn green. If those coordinates in the screenshot are slightly offset vertically or are partially cut off, move your radar slightly to adjust and repeat these steps. Once these steps are completed, you should be able to move around and your map will automatically move with you.
-- Hotkeys|Buttons: To update your position on the map mark your position in the chat log again by pressing the correct ingame action key (P by default)
Note: You should have main chat logging enabled and be running the english language version for this to work. You must have "Position from Maximized Radar" checked in you File->Settings->Auto for the Automatic position tracking feature to work.
Troubleshoot: If nothing happens when you press P, open your chat.log and make sure the text is there and that it is in english:
2012-11-15 22:29:44 [Local] [] Your current position is: Calypso (77774, 76667, 163)
If the tool dosent automatically track you make sure your setting is enabled, the radar is visible and fully maximized, that you have enabled Verical Synchronization in game options, and that you are not playing in "Safe Mode".
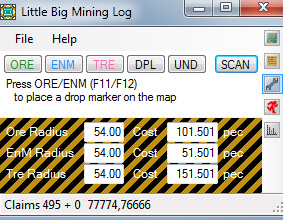
3.2 Configure your mining tools
You should configure your finder parameters of range and drop cost so you can take full advantage of the tools mapping and run tracking features. To do this follow these 3 simple steps:1) Press the wrench icon to bring up the tool details pane
2) Enter the range and decay for each drop type
3) Press the wrench again to hide the tool details pane
Setting these correctly will allow the map to display what area has been mined and for the tool to track your expenses. Remember to include the cost of the tool decay and the cost of the probes, also if you are using amplifiers dont forget to include those too. For enchaners see notes about additional costs for runs.
3.3 Mark your Drop Location
When you mine its a good idea to mark your drop location on the map. This will help you keep track of where you droped so you dont waste ped mining the same area twice or overlaping your drops too much.-- Automatic: Keep your green mining interface visible and the tool will mark drops for you as they happen, be sure to have your position updated
-- Hotkeys: When you want to mark a drop press one of the hotkeys (default F11-ore, F12-enm, F9-tre) you can change these in settings and if you mine multiple types of resources at once you can assign 1 key to multiple drop types
-- Buttons: Press the buttons on the gui for each drop type you want to mark on the map.
Note: You must have "Detect Drops" checked in you File->Settings->Auto for the Automatic position tracking feature to work.
Troubleshoot: If the tool dosent automatically detect your drops make sure your setting is enabled, the green tool gui is fully visible, that you have enabled Verical Synchronization in game options, and that you are not playing in "Safe Mode".
3.4 Scanning a Claim Deed
The key feature of little big mining log is scanning and logging your claim deeds. You can then view your claim collection on your map and identify "good" places to mine. Here is how you log a claim into the program:In all cases the claim deed must be fully visible, focused (click on it to focus notice the colors get brighter and background darker), and the claim deed object must be hidden not to interfere with the text visibility.
-- Automatic: Open the claim deed and let the tool do its work.
-- Hotkeys: Press the key you assigned to the "Scan Claim" action (PRTSCR by default)
-- Buttons: press the SCAN button on the gui
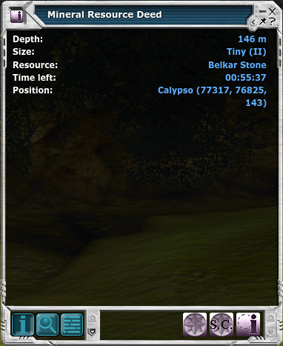
Once you successfuly scna the claim deed the main program window will list its details, LiBi will read them outloud to you, your map will be updated with a claim marker, the drop circle adjusting to the drop distance and changing color, the claim will also be connected to the drop with a line. If you hover your mouse over the claim marker you can see its details.
Important: The Claim Deed Window must be focused for the claim scanning to work. When you open the claim deed window it is focused. It loses focus if you click your mouse outside of it or if you switch from "cursor mode" to "mouse look mode" by pressing the spacebar in-game. To regain focus click on the claim deed window or move your mouse on top of it for temporary focus.
Note: The Claim deed window must be in focus and fully visible. The claim deed object must be hidden.
You must have "Detect and Scan Claims" checked in you File->Settings->Auto for the Automatic claim scanning feature to work.
Troubleshoot: You can always check your error folders to figure out what went wrong if you scanned automaitcally, in most cases it will be the focus issue however some bright backgrounds might cause problems for the scan algorithm especialy light sources, if you suspect that is the case try moving your claim deed to a different background for example on top of your inventory window. If the tool dosent automatically detect your claim make sure your setting is enabled and that you have enabled Verical Synchronization in game options, sometimes it might take up to a few seconds for the claim to scan.
4 Advanced Topics of operation
4.1 Dealing with Unknown
When you find an unknown and the claim does not dissapear after the first extraction you can re-open the claim deed or press the info icon to reload it. Scanning the deed again will update the unknown claim deed automatically and you will be awarded normal miner and ranking points. If the resource is depleted then you can manually edit the claim by rightclicking on it in the map window, in sucha a case however you will be awarded no points.
4.2 Mining Runs
Runs are collections of drops with associated costs and statisics. A run will be automatically started when you make your first drop, you can manualy start and stop a run in the runs window. Its reccomended to start and stop a run each time you do the same ingame judging by whatever you consider a mining run, after all this tool is for you.
4.3 Summoning a Claim
Take care when summoning a claim with automatic detection not to double scan the same claim in different locations. If you try to submit a summoned claim your backed system will detect it and award you with no points. Take care not to submit the same claim multiple times to prevent confusion on your mining map.
4.4 Undo a Drop
If you place a drop marker multiple times on the map by accident you can undo that by using he undo button or hotkey. In such a case the drops that are not matched to any claims will be removed starting from the most recent.
4.5 Deplete a Claim
If a claim marker is going even though the claim is already depleted you can manually deplete it by using the deplete button or hotkey. There is no range for this and you can deplete multiple timers starting with the closest timer first.
4.6 Importing and Exporting Data
You must create a coma separated file (CSV) you can use excel for that. You must label each column with the following exact names: (resource,x,y,size,depth,time,planet) you can use a different order but the names have to be the same. Afterwards use "File->Import->Import Claims From CSV" to locate your file and import the claims into LBML. If you want to remove them use the "Clear All Imported Claim Data" option from the same menu.5 Tool windows description
Here we will discuss the tool windows in details.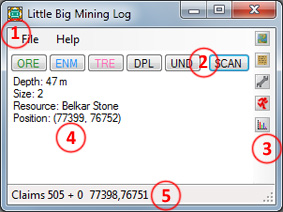
5.1 Main Window
1) In the "File" menu you will find options for Importing/Exporting data see the appropriate chapter in the Advanced Topics section. The Setting option will open the settings window. Log Out will restart the program erasing your stored Login and Password from the configuration file. Exit will close the Program. In the "Help" menu you will find information about the program.2) The horizontal buttons are used to operate the tool in Button mode:
ORE - marks a drop for ores
ENM - marks a drop for enmatters
TRE - marks a drop for treasures
DPL - depletes the closest claim timer
UND - undo the last no resource found drop
SCAN - scan the game window for claim deed
3) The vertical icons on the right hand side open the other windows:
Map window
Filters window
Tool settings pane
Runs window
Statistics Window
4) This is the main notification area where messages, deed details and potential errors will be shown.
5) The bottom status bar shows your collected + imported claim count and your last registered position.
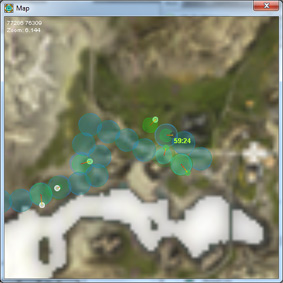
5.2 Map
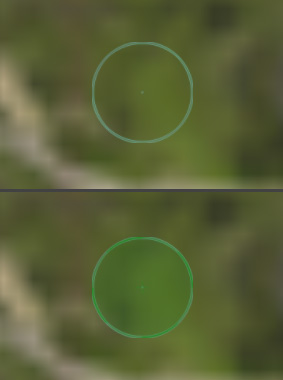
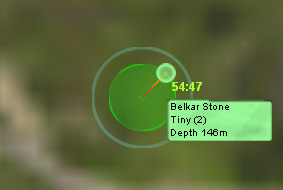
The Map window will display your claim data, your drop data, your position marker, claim timers and claim details. It also lists the mouse cursor position and zoom level in the top left corner text.Claims: The small colored circles are your scanned claim markers, they are color coded based on the values in your config file. You can move your mouse on top of them to see the claim details. For unknown claims you can right-click on them to edit the values. If a number appear next to the claim deed it indicated the time left for the deed extraction it will turn yellow then red as the time is running out.
Drops: are marked with large colored circles , they are color coded based on the values in your config file. There are different colors for drops that result in no resource found and drops that are paired with a claim. When you successfuly scan a claim the tool will attempt to match it with the most recent drop marker within range. The drop will change its color and a connecting line will be added. The new drop size will indicate the effective scanned range with that drop to assist you with mining area coverage.
Player: The player marker consists of 3 rings each with the size equal to the appropriate tool radius setting from the Tools pane in the main window. This marker will always be located at your currently scanned position and will indicate where the drop markers will be placed.
To Operate the map you can left-click-drag to move and scroll-up-down for zoom.
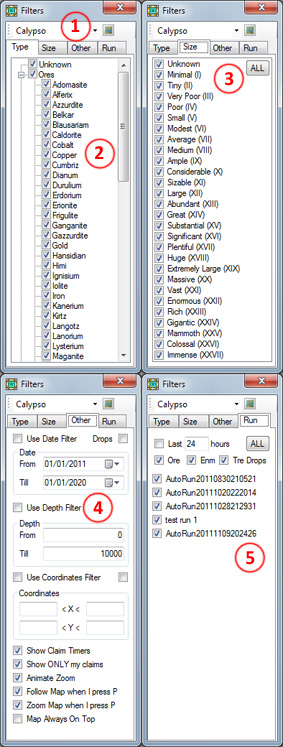
5.3 Filters
The Filters window is used to control the behaviour and contents of the map. You can select what appears on the map with a set of filters and also how the map behaves.1) The dropdown allows you to change which map is displayed and is used mostly for browsing your data. The small icon next to it allows you to show hide the map window.
2) The Types filter allows you to select which claim types should be displayed on the map.
3) The Size filter allows you to select which claim sizes should be displayed on the map
4) Other filters include:
Date filter allowing you to show only a time span of claims (left checkbox) and drops (right checkbox).
Depth filter aloowing you to show only a depth span of claims
Coordinate filter allowing to show only a section of your claims
There are also options to:
Show claim timers - the time countdown you have left untill the claim dissapears
Show only my claims - in case you have imported some claims this option will disable them
Animate zoom - determines if the map zoom is smooth or jumpy
Follow map when I press P - moves the map and centers on your avatar when you press P
Zoom map when I press P - zooms the map to a level defined in the configuration when you press P
Map always on top - sets the map window to always be on top of all other program windows
5) You can also filter out you drops based on last X hours or drop type or by specific run groups in the Run tab.
Filters selected for claims will affect the map display and also the Exported claims if you choose Export Visible option.
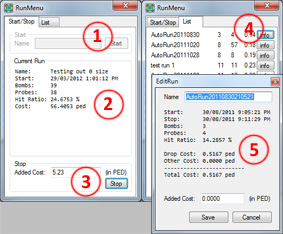
5.4 RunMenu
If you do not start a Run by yourself the program will do it for you automatically, naming it AutRun[date][time]. Runs are collections of your drops and allow you to keep track of the cost and hit ratios.1) If the tool hasnt already you can type a custom run name and press start to initiate it
2) The current run area will display specific details of the run you are currently on, including drops and hit ratio as well as toatl cost. The cost is calculated based on your Tools configuration from tha main window tools pane.
3) When you decide to finish your run you can enter any additional costs you took like enchancers, ammo or decay, and press Stop.
4) In the List tab you will be presented with a list of all your Runs, and numbers for drops and hit ratio.
5) If you press the info button you will be presented with Run details where you can edit your aditional costs and run name.
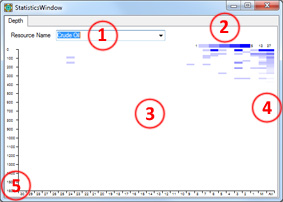
5.5 Statistics
The statistics window helps you analyze your data. In the Depth tab you can see agregated depth data for your claims.1) Select your resource type from the drop down box
2) The horizontal bar will show the color scale and range, the darker the color the more claims found at the given depth.
3) The main pain shows how many claims at a given depth on each day you have found.
4) The two rightmost vertical bars show depth data agregation from last 30 days and all time data. The numbers on the top indicate the ammount of claims in the darkest box.
5) The bottom axis are days (30 days ago to 1 day ago) the left axis is depth in 20 meter increments.
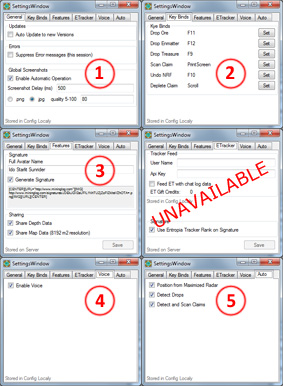
5.6 Settings
The settings window cna be oppend by selecting File->Settings in the programs main window.1) In the general tab you will find:
Checkbox indicating if you want the tool to automatically update to new versions on startup. If it is unselected you will be asked if you want to update.
An option to Supress error messages in this tool session if you are bugged by some problem and this will disable the error popups while allowing you to still operate some of the tools working functionality
Settings for global screenshots. If you global/hof/ath/make a discovery,or get a new skill the tool will make a screenshot. For this to happen you must correctly configure your full avatar name. You can select the delay from when the chat message appears to when the screenshot is taken and the file format the image should be saved in (for jpg you can also select the compression level).
2) Key Binds allows you to configure which keys map to which tool actions. You can set the same key to multiple actions for example making a drop. To set a kotkey press the Set button then press the key on your keyboard.
3) On the Features tab you can set your full avatar name and decide if you would like our system to generate a signature for you. You can then use this signature on forums where it will display your current ranking and mining stats. You can use the BB code provided to paste on the forum that way the signature will link back to our website. In the sharing section you can select if you would like your data to feed the general statistics visible on our website for depth and claim distributions on the maps.
4) Voice tab allows you to select if you want LiBi talking to you or not.
5) Auto tab holds settings for our automated features. Detecting your position from the maximized radar, detecting drops from your detectonator interface and automatic scanning of claim deeds.
Note: Currently feeding data to entropia tracker functionality is suspended and the settings for this will not do anything.
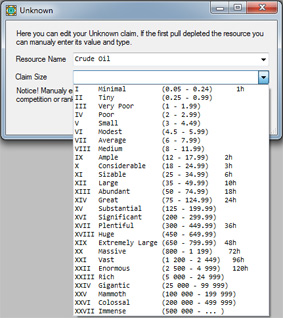
5.7 Unknown
The unknown window appears when you right click on an unknown claim in the claim deed window. You can manualy edit the unknown claim by selecting its resource type and the claim size.Note: When you manualy edit claims you do not receive any ranking on mining points.
6 Configuration File
The Configuration file is located in littlebigmininglog.exe.configSome settings have a value of 0/1 which is equivalent to false/true. And is usualy reflected by a checkbox in the settings window 0=unchecked, 1=checked. Not all of these settings are available inside the tool so please browse the list and customize the Little Big Mining Log to your liking.
| Disable Key Binding for Kotkeys | ||
| nokeybinds | 0 | Determines the sue of keybinding |
| Hot Keys | ||
| KeyBind_DropOre | F11 | Keybind to place a marker for Ore |
| KeyBind_DropEnm | F12 | Keybind to place a marker for Enmatter |
| KeyBind_DropTre | F9 | Keybind to place a marker for Treasure |
| KeyBind_ReadClaim | PrintScreen | Keybind to scan a claim deed |
| KeyBind_Undo | F10 | Keybind to undo a drop |
| KeyBind_Deplete | Scroll | Keybind to deplete the closest claim |
| Username and Password | ||
| Login_UserName | Your saved login e-mail | |
| Login_Password | Your saved password | |
| Login_AutoLog | 0 | Determines if to skip the login screen and use the above |
| Automatic Operation | ||
| Auto_Position | 1 | Use automatic position detection |
| Auto_Drops | 1 | Use automatic drop detection |
| Auto_Claims | 1 | Use automatic claim scaning |
| Window Position | ||
| Window_Position_Main | String that remembers the main window position and size | |
| Window_Position_Map | String that remembers the map window position and size | |
| Window_Position_Filters | String that remembers the filters window position and size | |
| Window_Position_Runs | String that remembers the runs window position and size | |
| Window_Position_Stats | String that remembers the statistics window position and size | |
| Window_Position_Settings | String that remembers the settings window position and size | |
| Updater | ||
| Update_Auto | 0 | Perform update without asking |
| Entropia Config File Path | ||
| Entropia_SettingsCePath | Path to the settings file if cannot be found | |
| Tool Settings | ||
| Player_OreRadius | 54 | Configuration for ore finder tool radius |
| Player_EnmRadius | 54 | Configuration for enmatter finder tool radius |
| Player_TreRadius | 54 | Configuration for treasure finder tool radius |
| Player_OreCost | 101.501 | Configuration for ore drop cost |
| Player_EnmCost | 51.501 | Configuration for enmatter drop cost |
| Player_TreCost | 151.501 | Configuration for treasure drop cost |
| Map Menu Settings | ||
| Map_UseDateFilterForClaims | 0 | Should claim date filter be used |
| Map_UseDateFilterForDrops | 0 | Should drop date filter be used |
| Map_UseDateFilterFrom | 2011/01/01 | Start date for date filter |
| Map_UseDateFilterTill | 2020/01/01 | End date for date filter |
| Map_UseDepthFilter | 0 | Should depth filter be used |
| Map_UseDepthFilterFrom | 0 | Start depth for depth filter |
| Map_UseDepthFilterTill | 10000 | End depth for depth filter |
| Map_UseCoordFilterForClaims | 0 | Should claim coordinate filter be used |
| Map_UseCoordFilterForDrops | 0 | Should drop coordinate filter be used |
| Map_UseCoordFilterX1 | Start X coordinate for coordinate filter | |
| Map_UseCoordFilterX2 | End X coordinate for coordinate filter | |
| Map_UseCoordFilterY1 | Start Y coordinate for coordinate filter | |
| Map_UseCoordFilterY2 | End Y coordinate for coordinate filter | |
| Map_ShowOnlyMyClaims | 0 | Should imported claims be hidden |
| Map_FollowOnP | 1 | Should the map center on player when pressing P |
| Map_ZoomOnP | 1 | Should the map zoom when pressing P |
| Map_ZoomOnPLevel | 15 | Default zoom level |
| Map_ZoomAnimation | 1 | Should the zoom sequence be smooth |
| Map_AlwaysOnTop | 0 | Should the map window be always on top |
| Map_ZoomSpeed | 0.8 | Speed of the zoom animation |
| Map_ShowClaimTimers | 1 | Should claim timers be shown on the map |
| Voice | ||
| Voice_Enable | 1 | Should LiBi talk to you |
| Drops Filters | ||
| Drops_UseLastXHours | 0 | Should only recent drops be shown |
| Drops_LastXHoursValue | 24 | Number of hours to show drops from |
| Drops_ShowOre | 1 | Show Ore Drops on map |
| Drops_ShowEnm | 1 | Show Enamtter Drops on map |
| Drops_ShowTre | 1 | Show Treasure Drops on map |
| Screenshots | ||
| Image_ErrorFolder | Errors\ | Save location for error files and images |
| Image_SuccessFolder | Screenshots\ | Save location for claim screenshots |
| Image_JpegQuality | 80 | Quality of claim screenshot |
| Screenshot_Enable | 1 | Should global/hof/ath/discovery/skill screenshots be taken |
| Screenshot_AutoDelay | 500 | The delay for the global screenhots |
| Screenshot_IsPng | 0 | Should the global screenshot be saved in png format |
| Screenshot_JpegQuality | 80 | If not png what qualit should the jpeg be |
| Map Files | ||
| Calypso_File | Maps\calypso_map.bmp | Path to Calypso map file |
| NextIsland_File | Maps\nextisland_map.bmp | Path to Next Island map file |
| Asteroid_File | Maps\asteroid_map.bmp | Path to Asteroid map file |
| Rocktropia_File | Maps\rocktropia_map.bmp | Path to Rocktropia map file |
| Hell_File | Maps\hell_map.bmp | Path to Hell map file |
| Arkadia_File | Maps\arkadia_map.bmp | Path to Arkadia map file |
| Cyrene_File | Maps\cyrene_map.bmp | Path to Cyrene map file |
| Map File Offsets | ||
| Calypso_LeftOffset | 16384 | Game Map left coordinate |
| Calypso_BottomOffset | 24576 | Game Map bottom coordinate |
| Asteroid_LeftOffset | 65536 | Game Map left coordinate |
| Asteroid_BottomOffset | 65536 | Game Map bottom coordinate |
| Rocktropia_LeftOffset | 122880 | Game Map left coordinate |
| Rocktropia_BottomOffset | 81920 | Game Map bottom coordinate |
| NextIsland_LeftOffset | 122880 | Game Map left coordinate |
| NextIsland_BottomOffset | 81920 | Game Map bottom coordinate |
| Hell_LeftOffset | 32768 | Game Map left coordinate |
| Hell_BottomOffset | 16384 | Game Map bottom coordinate |
| Arkadia_LeftOffset | 8192 | Game Map left coordinate |
| Arkadia_BottomOffset | 8192 | Game Map bottom coordinate |
| Cyrene_LeftOffset | 122880 | Game Map left coordinate |
| Cyrene_BottomOffset | 73728 | Game Map bottom coordinate |
| Colors for Player | ||
| PlayerColor_Ore1 | ForestGreen | Player circle ore color 1 |
| PlayerColor_Ore2 | Lime | Player circle ore color 2 |
| PlayerColor_Enm1 | Cyan | Player circle enmatter color 1 |
| PlayerColor_Enm2 | DodgerBlue | Player circle enmatter color 2 |
| PlayerColor_Tre1 | Pink | Player circle treasure color 1 |
| PlayerColor_Tre2 | HotPink | Player circle treasure color 2 |
| Colors for Drops | ||
| DropColor_Ore1 | ForestGreen | Drop color ore no resource found |
| DropColor_Ore2 | Lime | Drop color ore resource found |
| DropColor_Enm1 | DodgerBlue | Drop color enmatter no resource found |
| DropColor_Enm2 | Cyan | Drop color enmatter resource found |
| DropColor_Tre1 | Pink | Drop color treasure no resource found |
| DropColor_Tre2 | HotPink | Drop color treasure resource found |
| Colors for Claims | ||
| Color_0 | #424242 | Unknown |
| Color_1 | 210, 210, 0 | Adomasite Stone |
| Color_2 | PaleGreen | Alferix Stone |
| Color_3 | Firebrick | Azzurdite Stone |
| Color_4 | PaleGreen | Belkar Stone |
| Color_5 | SlateBlue | Blausariam Stone |
| Color_6 | DarkOliveGreen | Caldorite Stone |
| Color_7 | LightSteelBlue | Cobalt Stone |
| Color_8 | SandyBrown | Copper Stone |
| Color_9 | Olive | Cumbriz Stone |
| Color_10 | PowderBlue | Dianum Ore |
| Color_11 | Beige | Durulium Stone |
| Color_12 | MediumAquamarine | Erdorium Stone |
| Color_13 | RosyBrown | Erionite Stone |
| Color_14 | WhiteSmoke | Frigulite Stone |
| Color_15 | LightSalmon | Ganganite Stone |
| Color_16 | Goldenrod | Gazzurdite Stone |
| Color_17 | Yellow | Gold Stone |
| Color_18 | OliveDrab | Hansidian Rock |
| Color_19 | DarkKhaki | Himi Rock |
| Color_20 | PaleTurquoise | Ignisium Stone |
| Color_21 | Khaki | Iolite Stone |
| Color_22 | DarkGray | Iron Stone |
| Color_23 | LightCyan | Kanerium Ore |
| Color_24 | LightSkyBlue | Kirtz Stone |
| Color_25 | Cyan | Langotz Ore |
| Color_26 | IndianRed | Lanorium Stone |
| Color_27 | White | Lysterium Stone |
| Color_28 | LightCoral | Maganite Ore |
| Color_29 | CornflowerBlue | Megan Stone |
| Color_30 | MediumSeaGreen | Morpheus Stone |
| Color_31 | YellowGreen | Narcanisum Stone |
| Color_32 | Red | Niksarium Stone |
| Color_33 | DarkViolet | Petonium Stone |
| Color_34 | AliceBlue | Platinum Stone |
| Color_35 | PaleGoldenrod | Pyrite Stone |
| Color_36 | 255, 255, 192 | Quantium Stone |
| Color_37 | Crimson | Redulite Ore |
| Color_38 | MediumAquamarine | Rugaritz Ore |
| Color_39 | Chocolate | Terrudite Stone |
| Color_40 | DarkSlateGray | Tridenite Ore |
| Color_41 | DarkOrange | Valurite Stone |
| Color_42 | 250, 250, 90 | Vesperdite Ore |
| Color_43 | 255, 128, 128 | Xeremite Ore |
| Color_44 | Lime | Zanderium Ore |
| Color_45 | SkyBlue | Zinc Stone |
| Color_46 | GreenYellow | Acid Root |
| Color_47 | Peru | Alicenies Liquid |
| Color_48 | LightGray | Angel Scales |
| Color_49 | MediumPurple | Angelic Grit |
| Color_50 | BlueViolet | Ares Head |
| Color_51 | DeepSkyBlue | Azur Pearls |
| Color_52 | ForestGreen | Binary Fluid |
| Color_53 | 210, 255, 140 | Blood Moss |
| Color_54 | 170, 25, 55 | Cave Sap |
| Color_55 | 80, 190, 80 | Crude Oil |
| Color_56 | MistyRose | Devil's Tail |
| Color_57 | HotPink | Dianthus Liquid |
| Color_58 | 255, 225, 0 | Dunkel Particle |
| Color_59 | 0, 150, 170 | Energized Crystal |
| Color_60 | PaleVioletRed | Ferrum Nuts |
| Color_61 | 255, 100, 50 | Fire Root Globule |
| Color_62 | Violet | Force Nexus |
| Color_63 | OrangeRed | Garcen Grease |
| Color_64 | SteelBlue | Growth Molecules |
| Color_65 | PapayaWhip | Henren Stems |
| Color_66 | MediumOrchid | Lumis Leach |
| Color_67 | DodgerBlue | Lytairian Dust |
| Color_68 | SpringGreen | Magerian Mist |
| Color_69 | RoyalBlue | Melchi Water |
| Color_70 | Crimson | Solis Beans |
| Color_71 | MediumSlateBlue | Sweetstuff |
| Color_72 | SeaGreen | Typonolic Steam |
| Color_73 | Plum | Vegatation Spores |
| Rocktropia Specific | ||
| Color_74 | Silver | Alternative Rock |
| Color_75 | LightSkyBlue | Blues Rock |
| Color_76 | DarkSeaGreen | Folk Rock |
| Color_77 | Lavender | Glam Rock |
| Color_78 | LimeGreen | Grunge Rock |
| Color_79 | DarkGray | Hard Rock |
| Color_80 | Thistle | Jazz Rock |
| Color_81 | MediumSeaGreen | Punk Rock |
| Color_82 | LightYellow | Reggea Rock |
| Color_83 | WhiteSmoke | Techno Rock |
| Color_84 | DarkOrchid | Hurricane Cocktail Mix |
| Color_85 | DarkOrange | Mai Tai Cocktail Mix |
| Color_86 | DodgerBlue | Mojito Cocktail Mix |
| Color_87 | LimeGreen | Nirvana Cocktail Mix |
| Color_88 | YellowGreen | Pina Colada Cocktail Mix |
| Color_89 | RosyBrown | Black Russian Cocktail Mix |
| Color_90 | BurlyWood | Harvey Wallbanger Cocktail Mix |
| Color_91 | CornflowerBlue | Kamikaze Cocktail Mix |
| Color_92 | OliveDrab | Long Island Ice Tea Cocktail Mix |
| Color_93 | MediumPurple | Whiskey Sour Cocktail Mix |
| Arkadia Specific | ||
| Color_94 | #aaaa55 | Banite Stones |
| Color_95 | #ca853b | Hebredite Stones |
| Color_96 | #1b65b7 | Kaz Stones |
| Color_97 | #f1c119 | Lidacon Stones |
| Color_98 | #dff119 | Ospra Stones |
| Color_99 | #669b55 | Telfium Stones |
| Color_100 | #ffb922 | Veda Stones |
| Color_101 | #685e48 | Wenrex Stones |
| Color_102 | #4bdda8 | Yulerium Stones |
| Color_103 | #ffd789 | Zulax Stones |
| Color_104 | #75c6c5 | Edres Resin |
| Color_105 | #477bb0 | Florican Mist |
| Color_106 | #bd9237 | Hydrogen Steam |
| Color_107 | #67c7cd | Pel Crystals |
| Color_108 | #624add | Quil Sap |
| Color_109 | #974b64 | Somin Tar |
| Color_110 | #a6011c | Star Particles |
| Color_111 | #aad1b8 | Vorn Pellets |
| Color_112 | #993b3b | Xelo Haze |
| Color_113 | #5c5fd0 | Zolphic Oil |
| And some more newly added (will sort these out later) | ||
| Color_114 | Dark Lysterium | |
| Color_115 | Iridium Ore | |
| Color_117 | Sothorite Ore | |
| Color_118 | Zorn Star Ore | |
| Color_119 | Blue Crystal | |
| Color_120 | Clear Crystal | |
| Color_121 | Green Crystal | |
| Color_122 | Purple Crystal | |
| Color_123 | Red Molten Crystal | |
| Color_124 | Yellow Crystal | |
| Color_125 | Aakas Alloy Aa | |
| Color_126 | Aarkan Pellets | |
| Color_127 | ChemSet | |
| Color_128 | Khorudoul Extrusion | |
| Color_129 | Khorum Alloy | |
| Color_130 | Part Of Brass Alloy | |
| Color_131 | Part Of Bronze Alloy | |
| Color_132 | Part Of Flint Arrow Head | |
| Color_133 | Part Of Flint Axe Head | |
| Color_134 | Part Of Fly Amber | |
| Color_135 | Part Of Fossil Ammonite | |
| Color_136 | Part Of Fossil Tooth | |
| Color_137 | Part Of Mosquito Amber | |
| Color_138 | Songkra Alloy | |
| Color_139 | Songtil Agent | |
| Color_140 | Vedacore Fibre | |
| Color_116 | Praetonium | |
| Color_141 | Tananite Ore | |
| Color_142 | Kaisenite Stone | |
| Color_143 | Arekite Stone | |
| Color_144 | Cordul Stone | |
| Color_145 | Frakite Stone | |
| Color_146 | Bodai Dust | |
| Color_147 | Gorbek Emulsion | |
| Color_148 | Lotium Fluid | |
| Color_149 | Alkar Crystals | |
| Color_150 | Diagen Firedrops | |
| Color_151 | Hexra Gems | |
| Color_152 | Pirrel Pallets | |
| Color_153 | Quenta Flux | |
| Color_154 | Regula Lode | |
| Color_155 | Starrix Nodes | |
| Color_156 | Cyrenium Ore | |
| Color_157 | Nosifer Stone | |
| Color_158 | Olerin Stone | |
| Color_159 | Wiles Stone | |
| Color_160 | Ycyan Ore | |
| Color_161 | Hazy Crystal | |
| Color_162 | Orange Crystal | |
| Color_163 | Rainbow Crystal | |
| Color_164 | Maladrite Stone | |
| Color_165 | Zoldenite Dust | |
| Color_166 | Aqeeq Stone | |
| Color_167 | Fairuz Stone | |
| Color_168 | Lulu | |
| Color_169 | Qasdeer Stone | |
| Color_170 | Zircon Stone | |
| Color_171 | Ghali | |
| Color_172 | Mamnoon | |
| Color_173 | Nawa Drops | |
| Color_174 | Sham | |
7 Final notes
7.1 A word on keyboard hooking
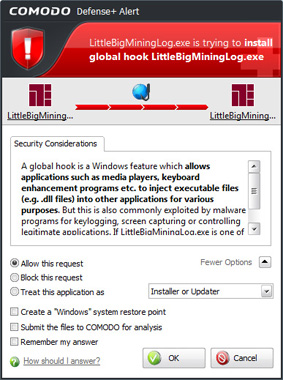
The program utilizes a technique called keyboard hooking. It is used to capture the keys pressed on the keyboard, that are sent to the operating system, even if the application does not have focus. This technique enables the cool feature of binding action keys, and carrying out operations (marking drops, undoing drops and also performing the Image Recognition) without leaving the game window and the game action.Care should be taken by any user allowing an application access to keyboard hooking, there are plenty potentially harmful programs that will capture your keyboard input to log the keys pressed recording passwords and other sensitive information. Our application does not store your pressed key, it only acts when it discovered a key was pressed that was previously assigned to an action in the settings menu.
If you do not wish for the program to establish a hook with your keyboard you can disable key bindings on startup by setting the nokeybinds option to 1 in the littlebigmininglog.exe.config file.
If you wish to have key binds but are concerned about the security of this solution, We recommend running the tool after you log in to Entropia Universe, and shutting it down after you end your game session or for the time periods where your sensitive information is exposed by, you typing it on your keyboard.